Textiles artists like me

I am proud to be an active member of SAQA (Studio Art Quilt Associates). Quilts and quilters are usually viewed as “crafters.” When you say you’re a quilter, people immediately think of an older woman they know who “used to quilt.” Usually, this person is their grandmother.

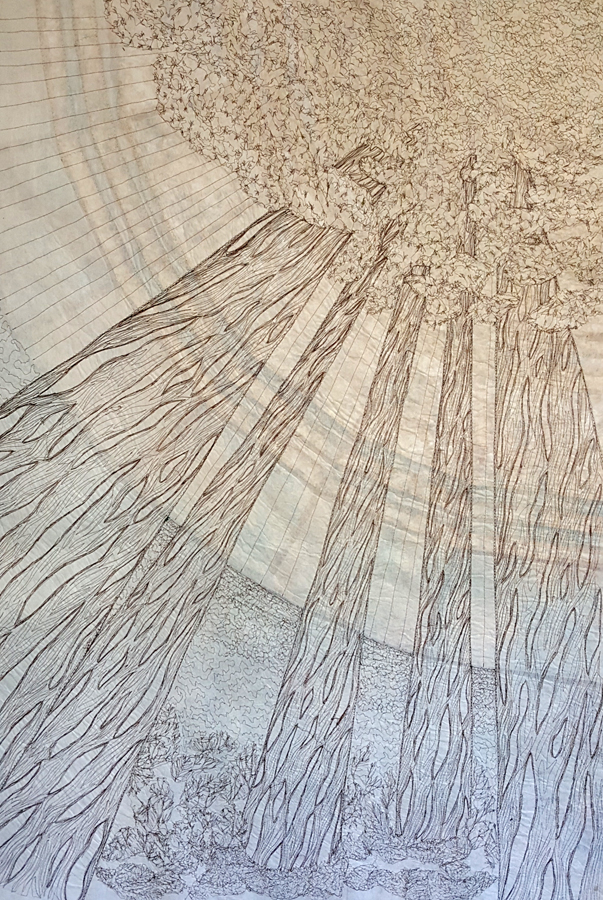
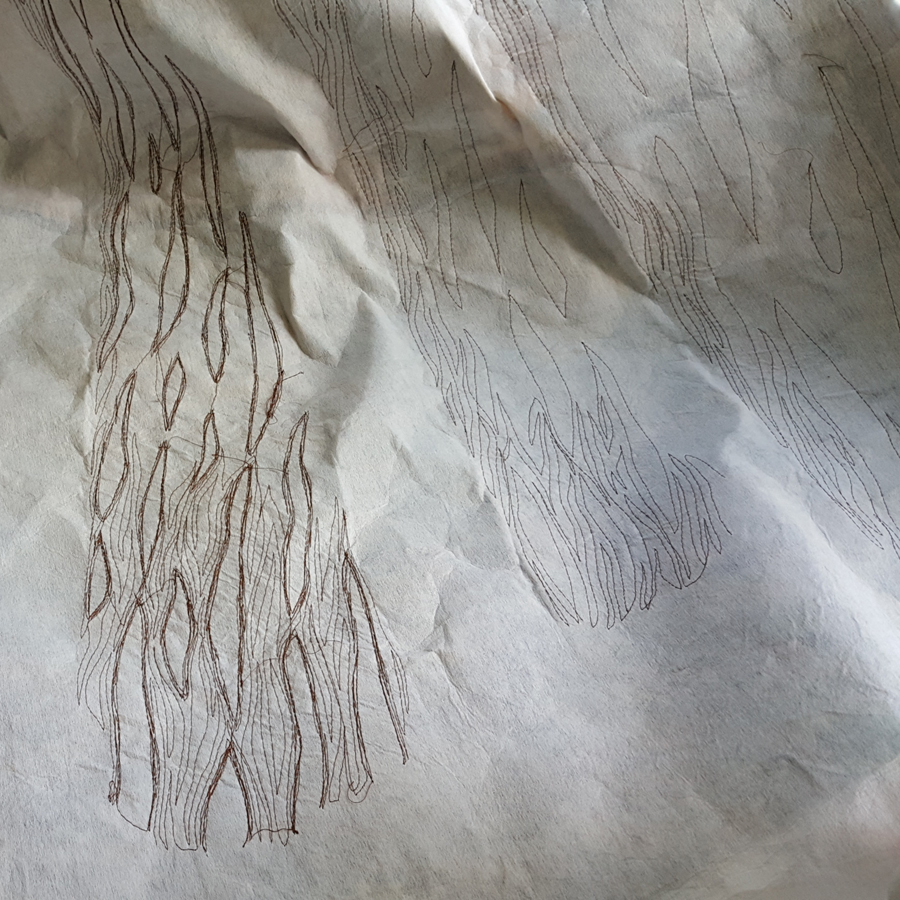
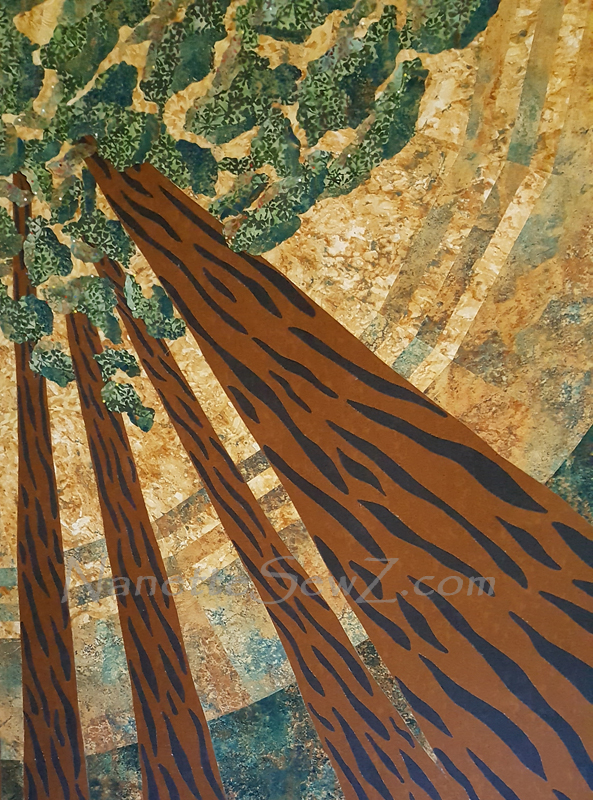
I think part of the reason I struggled with calling myself an artist for so long was because of this stigma. When I initially started exploring art quilting, I realized this was something different. The medium (fabric) is generally what “grandma” used, but the application is really different. Envelopes are often pushed.

Th perception that “textile artist = crafter” is changing because of SAQA. They are huge proponents for recognizing textile art as fine art. They advocate that quilts, and other textile works, be showcased in museums and art galleries, not just quilt shows.

I feel empowered being associated with this International organization. I’ve attended three SAQA conferences and I’m currently a Regional Representative. A huge part of my energy comes from the members. They are caring and supportive. If you need to know anything about the professional journey, they are there to answer your questions.

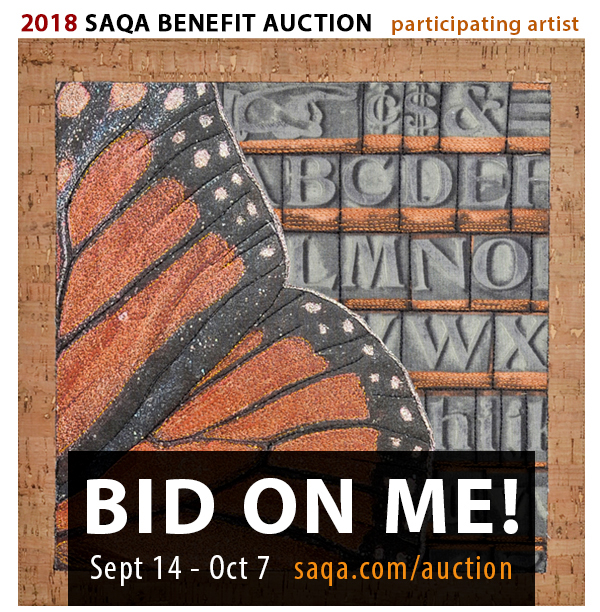
A major part of SAQAs funding for exhibits and advocacy comes from their annual benefit auction which starts Sept 14http://www.saqa.com/auction-quilts.php ). Members were asked to make 12″ x 12″ quilts and donate them to the auction. Each week a different set of quilts is offered and the bids are reduced daily over the course of 7 days, or until someone accepts the current bid price.

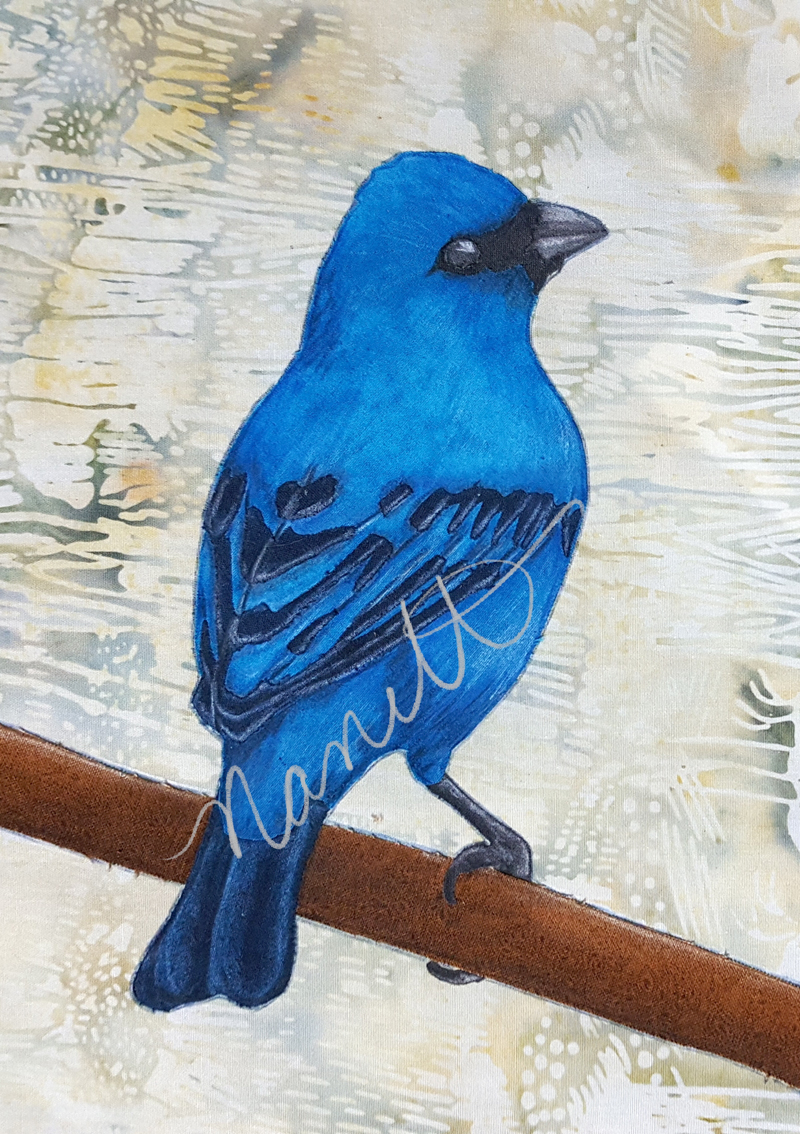
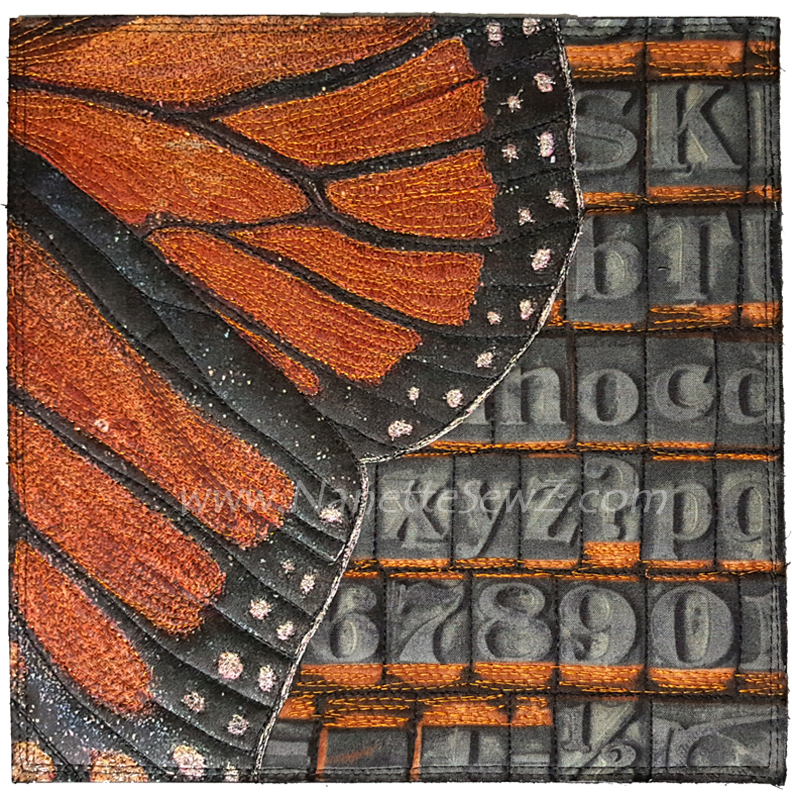
Its fun to participate. There are some amazing pieces, with some created by top names in the industry. I’m happy to be participating for the 4th time. I’m in section #2, so look for the monarch butterfly wing or any of the other fabulous quilts (available for bidding September 24 – 30). Its a great opportunity to get a fabulous piece of art while supporting an organization dedicated to supporting textiles artists like me.
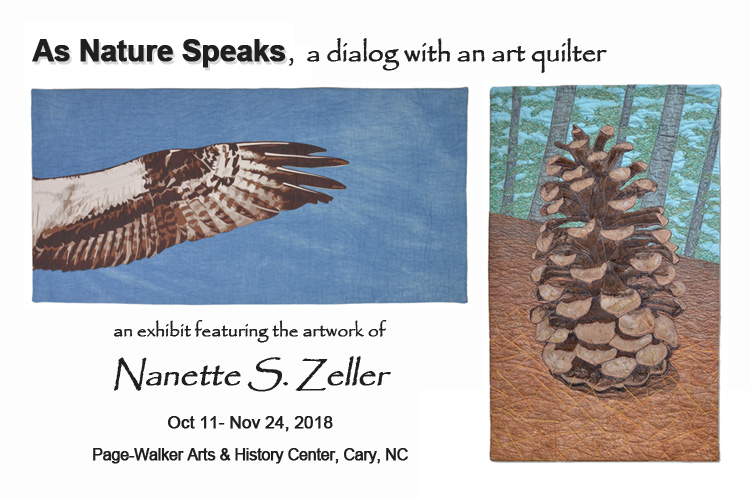


As Nature Speaks, a dialog with an art quilter
Featuring the artwork of Nanette S. Zeller
Oct 11- Nov 24, 2018
Page-Walker Arts & History Center, Cary, NC
For more information click here: As Nature Speaks

Artist Talk: Saturday, Oct 13, 2018 – 10:30-11:30 more info
Artist Reception: Friday, October 26 – 6-8pm more info

Every challenge

Do you challenge yourself? I realize I challenge myself a lot.  I don’t know if I would ever be able to live without personal challenges. I always want to learn and grow.

In a little more than a month, I am hanging my solo show “As Nature Speaks” in a very large gallery space in Cary, NC. It literally has been 2 years of challenges to get here. The first challenge was finding the confidence to apply. One day, I just told myself “just go for it,” so I did.

The second challenge was deciding if I wanted to play it safe with a small exhibit or go big. With 2 years notice, I said, “go big!” There were many times along the way that I asked myself “what were you thinking?” But, I couldn’t give up, that just wasn’t an option.

There have been many other challenges on this journey, many dealing with self-motivation and time constraints. I had to learn how to stand my ground and say no to distractions.

I also had to challenge myself to show up and put in the time to create. I had the ongoing challenge of fighting with my perfectionist self who often wanted to play the game called “panic attack” (btw: the side with fear never won). I set the goals and met them.  Yes, this past 2 years have been one challenge after another.

But let me stop here … is a challenge a bad thing? I don’t think so. A challenge definitely isn’t easy. But, when you overcome the obstacle, its likely you’ll arrive on the other side feeling more powerful and having a sense of accomplishment. I like challenges, because when I’ve crossed the hurdle, I know I learned something new and have become stronger. There’s a new and improved me waiting on the other side of every challenge.


As Nature Speaks, a dialog with an art quilter
Featuring the artwork of Nanette S. Zeller
Oct 11- Nov 24, 2018
Page-Walker Arts & History Center, Cary, NC
For more information click here: As Nature Speaks

Backfacing quilts

I’ve had this nagging feeling for a couple years now. You know the one when something’s not right and you keep thinking about how to fix it? Sometimes I attribute this mocking thought-pattern to my sometimes perfectionistic personality (I am recovering…I promise!). I try to convince myself to get over it:  “Let it go … its Ok … no one will notice … you might ruin it if you try to fix it.” But, the voice persisted … for 2 years.

I couldn’t resist temptation any longer. I removed my quilt “soar” from storage and proceeded to remove all the fabric which bound the edges (aka facing). I couldn’t stand how it hung … all ruffly…yikes! Two years after making it, I finally realized what went wrong and had gained experience in how to block a quilt. When I originally finished the quilt, I had trimmed it cattywampass (yes, its a word!). It was time to take on the challenge to fix it.

First step … remove the facing and block the quilt. I placed it on a carpeted floor (face down) and gave it some steam with my iron (using a pressing cloth to protect the quilt). I pinned it into place so that it laid flat, then let it dry.

Second step … trim it square, then re-apply the facing. While doing this, I realized how un-square it actually was. Because the quilt is so large, I originally had trouble squaring it…which is what created the wonky shape it was in. I made a larger cutting surface this time by taping multiple cutting mats together on the floor. Now, I could accurately cut it into shape!

When I started this on Sunday, I have to admit I put myself into a bit of a panic. “What the heck was I doing?!!” I did a lot of self-talk to convince myself, I knew what I was doing and to proceed onward. I’m so glad that I did! It looks so much better. I didn’t have to trim much, but I did get it into shape. While I was at it, I got to enjoy all the quilting on the back. Just a note: I really need to consider making some backfacing quilts.


As Nature Speaks, a dialog with an art quilter
Featuring the artwork of Nanette S. Zeller
Oct 11- Nov 24, 2018
Page-Walker Arts & History Center, Cary, NC


Improvise or plan

I’m into the last couple months of prepping for my exhibit (details below). I’m trying to make some smaller pieces to hang along with my large art quilts. I’m currently working on a pitcher plant (work in progress pictured). When I started it, I thought it would be small and quick. In reality, its neither.

Making art can give your brain respite to think deeply about things. During all of this creating, I’ve been thinking about what and who I am, to include why and how I make art. I’ve also been listening to podcasts, my favorite is “Creative Pep Talk” with Andy Pizza. In one of his recent podcasts, he discussed how artists can fall into two categories; planners or improvisors.

I frequently say I’m a recovering perfectionist. People comment all they time how  organized I am (note: they haven’t seen my desk/studio). While I listened to Andy, I immediately thought … “I’m a planner … right?” Then I thought … “wait a minute!”

A planner charts things out and follows the plan. An improvisor just wings it. I realized I’m a little of both, but definitely use more improvise than planning. I never thought about it before. Sure you can look at my post from last week and see the line drawing I used to create this piece. I followed the layout pretty well, but I had no idea what my background would be until much later. I’m also adding more groundcover elements and will just improvise those when I got to that stage of the process.

This quilt is a bit more “planned” than most. Usually I start with just an idea (vision) stuck in head. Then stumble through the process, re-evaluating myself at each new layer of design.

Andy suggests, whether you a plan or improvise your art, you should try to occasionally stretch yourself and do the opposite. That’s scary for me to think about, I’m comfortable at what I’m doing. But, that’s his whole point though, in order to grow/improve you have to challenge yourself… hmmm, can I do it?

This revelation makes me happy to note that I’m not such a control freak anymore. I don’t criticize myself (as much) if I go off plan, because I know how to improv my way out of a predicament. This is good news.

What about you? Do you improvise or plan?


As Nature Speaks, a dialog with an art quilter
Featuring the artwork of Nanette S. Zeller
Oct 11- Nov 24, 2018
Page-Walker Arts & History Center, Cary, NC


Adding those final details

If you haven’t figured it out by now, I really enjoy thread-painting.  It makes better sense to call the technique free-motion embroidery, but thread-painting is a more commonly used term. “Painting” with thread is very similar to traditional hand embroidery, something most people are familiar with. When I do free-motion embroidery, instead of hand-sewing, I use a sewing machine to apply the stitches. In hand-embroidery, you move the needle across the fabric and in thread-painting you move the fabric under the machine’s needle.

Last week I used a thread-painting technique to create fern shapes that I stitched to the tree quilt I’ve been working on. I created the ferns by stitching them onto water-soluble stabilizer that was secured in an traditional embroidery hoop. I drew an outline of the fern shape on the stabilizer, then went to town applying stitches with my sewing machine. When I finished stitching the shapes, I un-hooped the stabilizer and soaked the stitched motifs under running water. The stabilizer becomes gooey as it dissolves under the water and eventually all that’s left behind are the embroidered threads.

Once they were dry, I stitched the ferns to the base of the trees. The shapes add a nice 3-dimensional effect to the overall design. With this addition, I pretty-much finished the large tree quilt that I’ve been working on these past few month. I trimmed it to size and now just need to hand-stitch the facing (aka: finished edge) it into place. I also think I’m going to use some hand embroidery to add some additional pops of interest to the ground cover. I find handwork relaxing, so I’m going to take my time adding these final details.

Live a little longer

I dabble in genealogy and really find connection with a Mexican tradition called the “three deaths.” Our first death is when our bodies cease to function. The second death is when our body is lowered into the ground. And the 3rd death is when our name is spoken for the last time.

Last week I wrote about my curiosity regarding the longevity of my art quilts. In that post, I was basically contemplating the three deaths , not some unrealistic concern about becoming famous. As I do genealogy, I love discovering a relative who’s been dead a very long time. I sense that when I find them, that they’ve been resurrected.

For me after I’m forgotten, I hope every so often there’s a quilt or 2 hiding somewhere which resurrects itself (me). Realistically, textiles are a very fragile medium to work with. There are so many factors which can destroy them into piles of thread and dust. As I prepare for my solo exhibit later this year, I’m thinking about what this all means … to be making things.

I’m near completion of a piece I’ve been working on for awhile and it struck me that there are things getting buried during the construction. I’ve added a lot of thread painting to this piece. This week, when it was time to quilt it, I had to cover up the back-side of the stitching. It amazed me to see how my stitching created its own art piece.

It makes me think that maybe, this process of creating can also experience it’s own stages of life and three deaths. My thread painting was once an active part of the process, but that is over now and buried behind layers of fibers. When you see the finished piece, the thread work does not take center stage as is does on the back. It becomes blended into the layers of fabric, color and quilting. This secondary art piece I unintentionally created is likely never to be seen again. So, I thought maybe if I leave it’s picture here, it might live a little longer.


Never too late to learn

I have always enjoyed learning.  Learning doesn’t always have to mean learning a physical or intellectual skill. Sometimes you can learn about yourself and what works for you.

For example, the past several months I’ve been working on and blogging about a new art quilt inspired by a visit to Muir Wood National Monument. This piece is huge and, at times, a little unruly. Two weeks ago, I found that I was getting very frustrated with the progress of this piece. Because I really wanted to get it finished, I kept trying to plug along with it.

Every piece I make is unique and requires different techniques to accomplish my vision, therefore I’m not very systematic about what I do. As I progressed on this piece, I realized I was super tense working on it. Little obstacles kept appearing that made me re-think my path forward. During my most intense frustration, I posed a question to an online group asking them what they do when they feel this way: “Do you keep going and fight through the frustration?”  or, “do you call a time out, put it away and start working on something else?” I got mixed responses, but most seemed to agree walking away was a good choice.

I’ve always tried to drive on, but this time I had other small projects I could work on to allow a temporary break from the large quilt. This week I put the Muir quilt under the needle again. Its amazing how my attitude has changed. I’m once again excited about stitching on this quilt top. I learned something new about my creative self – stepping away is a good thing. Sometimes deadlines keep me from having this luxury but, I also don’t think I do my best work when I’m stressed. With this experiment I learned something new about myself: I can and should take a break when I need it.

Knowing how you work and what you need to succeed is owning a very valuable tool for your productivity.  Do you pay attention to your feelings when you work? You know, it’s never too late to learn.

Progress

I’m working on the thread painting stage of my latest quilt. Here’s a view of the back.

I’m not too concerned about how pretty it looks from this side, because in a little bit I will be covering it up with the batting layer and backing fabric. Once that’s finished you’ll never see this view again.

This quilt has been a bit of a challenge (sometimes they behave that way). While I was working on the foliage, I noticed something visually happening with the background. It truly bothered me, so I had to think about it for awhile. What do I about that issue? Hmm?

I don’t make cookie-cutter quilts designs. Its layer, upon layer of processes. Each quilt deserves a different treatment because I’m trying to represent different subject matter. You just can’t build a tree the same way you build a bird.

Some of my techniques are similar, but I’m literally winging it on every quilt. That’s why it takes me so long sometimes to complete these larger pieces. I have to look at what I’ve done and figure out how to do what’s next.

The good news is I’ve moved passed the tree foliage and I’m working on texturizing the tree trunks with thread painting. The problem has apparently been solved for now. Progress.


Where you’re going

I’m on a roll with my latest artwork.  Trees are positioned and its time to add the foliage. This is a bit tedious, because I’m not using a pattern. The tree trunks were cut from a pattern, but the deep groves and foliage are being free-form cut, positioned in place and then fused. Once I have all the greenery in place, I’ll start the thread work. I will quilt and stitch the layers together adding dimension with free-form machine embroidery. Still quite a bit to do, but I can see the progress.

Life is like that. Progress may not be quick, but as along as you keep working at it you’ll see the changes. Never give up, because little by little, you’ll eventually get to where you’re going.

Looking for more

I’m working on a group challenge this year that is forcing me to look at the details of an object.  So, what do I really see when I see something? There are a number of ways that I look closer at an object.

Sometimes I do it with binoculars. I see the birds at the bird feeder and pull out the binocs to look at the details of the wings or feather coloration. Today, I saw a bird fluttering about the feeder and I wasn’t sure, but thought I was seeing blue. With the aide of the binoculars, I clearly saw that it was a male indigo bunting. That was exciting to to see and felt like I’d won a prize.

Another way I see details is to plop myself on the ground and look close. Frequently, as I sit on the ground, I’ll use my cellphone camera to take micro shots of tiny objects. I get as close as I can and zoom in. Its amazing the fine detail you can see with these photos.

Once I have a good image, I’ll look for more details by zooming in on it with photo editing software. For example, this week I opened up a photo of a Monarch butterfly that I took several years ago. I zoomed in and cropped the photo to show just a portion of the full image. I find it interesting because you see things that you might not normally see.

I printed the cropped image on photo transfer paper, then applied it to fabric. I guess I could have moved on from there, but the process of stitching the image forced me to look even closer at the details. As I stitched, I paid close attention to the shapes, lines, and colors in the wing. So many layers of detail. As I delve deeper into this project, I realize I am consciously and unconsciously looking for more.